Part 2:基础
Part 1 讲"为什么"。Part 2 讲"WordPress 是什么"。 读完 Part 2,你能动手写主题、挂钩子、造自定义内容。
§12 文章与页面是什么
先给结论:WP 里内容分两类——文章和页面。 搞混它们,结构就乱了。
1. 文章(Posts) - 用于博客、文章等"列表里的内容"。 - 按时间倒序,最新的在最上面。 - 能用分类和标签组织,方便访客查找。 - 通常带评论,鼓励讨论,适合社媒分享。 - 带作者、发布日期等元数据。
2. 页面(Pages) - 用于"一次性"的静态内容:关于我们、隐私政策、联系页。 - 静态、不随时间变,没有分类/标签,没有评论。 - 能建子页面,形成层级结构。 - 用于站点固定内容。
入门到进阶参考:https://www.ashuwp.com/level/simple 从零安装:https://www.guoyuguang.com/woocommerce-wordpress-tutorial/
§13 主题开发:模板层次结构
先给结论:WP 靠"模板层次"决定加载哪个文件。 懂了这个,你才知道改哪个文件才生效。
WordPress 模板层次结构,是一套"按查询类型选模板"的规则。 访问不同页面,WP 按类型和查询结果挑模板文件。
页面类型包括:首页、单篇文章、单页面、自定义文章类型、搜索结果、分类标签页、404、附件页、隐私政策页等。
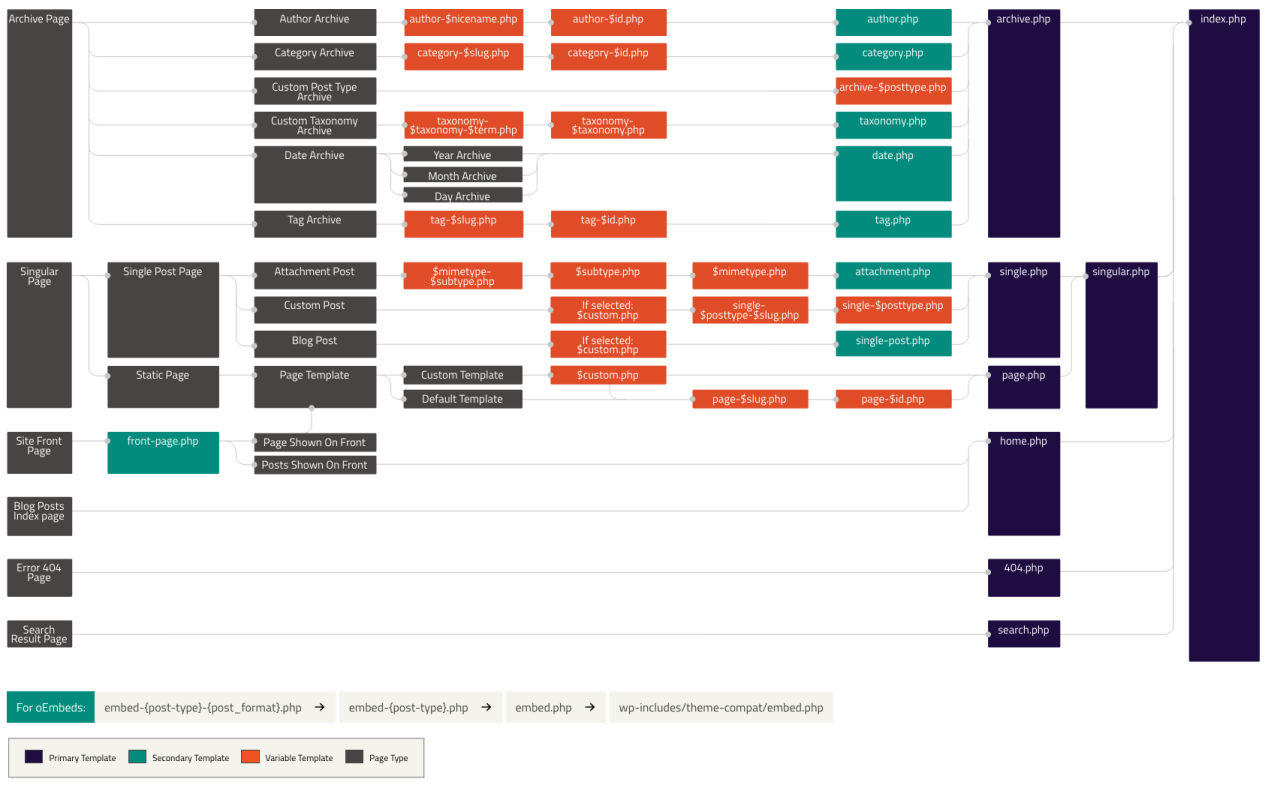
上图是页面、分类目录、标签的模板层级。几个典型链条:
- 作者归档:
author-$nicename.php→author-$id.php→author.php→archive.php→index.php - 分类归档:
category-$slug.php→category-$id.php→category.php→archive.php→index.php - 单篇文章:
single-$posttype.php→single.php→index.php - 静态页面:
page-$slug.php→page-$id.php→page.php→index.php - 首页:
front-page.php→home.php→index.php - 404:
404.php→index.php - 搜索:
search.php→index.php
模板层级默认设置
后台:设置 → 阅读 → 你的主页显示
- 你的最新文章
- 一个静态页面
静态页面走:front-page.php → home.php → index.php
数据调用 访问任意页面时,WP 按网址把数据调出来。
// index.php 里看看 WP 查到了什么
global $wp_query;
print_r($wp_query);
核心建议:调试模板时,先
print_r($wp_query)看 WP 认为自己在哪个页面。 比瞎猜高效十倍。
§14 主题开发:用循环处理文章
先给结论:The Loop 是 WP 取内容的发动机。 不会循环,就写不出列表页。
WordPress 的"循环"(The Loop)用来遍历数据库里的文章。 基本步骤:
① 启动循环:先判断有没有文章。
if ( have_posts() ) :
② 循环体:遍历每篇文章,用 $post 访问属性。
while ( have_posts() ) : the_post();
    // 在这里处理文章,比如显示标题、内容
endwhile;
③ 取文章属性:用 WP 提供的函数。
the_title( '<h2>', '</h2>' ); // 显示文章标题
the_content();                  // 显示文章内容
④ 无文章时:else 里给提示。
else :
    echo '没有找到文章。';
endif;
⑤ 循环后重置:多处用循环时很重要。
wp_reset_postdata();
自定义数据调用:自己 new 一个 WP_Query。
$myQuery = new WP_Query([
  'post_type' => 'post',
  'post__in'  => [184],
]);
if ($myQuery->have_posts()) {
  while ($myQuery->have_posts()) {
    the_post();
    the_title();                              // 标题
    the_post_thumbnail('thumbnail');          // 图片
    the_excerpt();                           // 摘要
    the_permalink();                         // 链接
    the_content();                           // 正文
    get_the_date('Y-m-d H:i:s');            // 时间
    the_author(); the_author_posts_link();   // 作者
    the_category();                          // 分类
    the_tags();                             // 标签
    if ( comments_open() ) {
      comments_template();                   // 评论
    }
  }
}
wp_reset_postdata();
注意:自己 new 的 WP_Query,用完一定要
wp_reset_postdata()。 忘了重置,下一个循环会读到上一条的数据。
§15 主题开发:用 functions.php 加功能
先给结论:functions.php 是主题的"总开关"。
想给主题加能力,基本都从这里挂。
清晰简单的 Bootstrap 基础商城模板参考:https://wordpress.org/themes/understrap/
向前桥接:循环和 functions.php 是主题的两条腿。 下一节讲插件开发,那是另一条更独立的路。
§16 插件开发入门
先给结论:插件 = 一个文件夹 + 一个主文件 + 钩子。 比主题更独立,不依赖某个主题。
创建插件要点(单例模式示例)
在 plugins 下建 wcc-alipay 目录,再建 wcc-alipay.php:
/**
 * Plugin Name: WooCommerce Alipay Gateway
 * Plugin URI: http://www.xxx.com
 * Description: 支付宝网关
 * Version: 3.2.5
 * Author: Automattic
 * Author URI: http://www.xxx.com
 */
if (! defined('ABSPATH')) {
  exit; // 防直接访问
}
// 定义常量
define('WCC_ALIPAY_PLUGIN_PATH', plugin_dir_path(__FILE__));
define('WCC_ALIPAY_PLUGIN_URL',  plugin_dir_url(__FILE__));

class WCC_Alipay {
  public function init() {
    // 判断 WC 是否启用,未启用则后续不执行
    if ( ! in_array('woocommerce/woocommerce.php', get_option('active_plugins'))) {
      return;
    }
    // 定义支付宝网关的核心类
  }
}

// 网关类定义钩子
add_action('plugins_loaded', 'init_your_gateway_class');
最佳插件合集参考:https://kinsta.com/topic/wordpress-plugins/#lms
§17 钩子、动作与过滤器
先给结论:Hook 是 WP/WC 扩展的灵魂。 不会 Hook,就只能改源码——那是下下策。
钩子分两类:动作(Actions) 和 过滤器(Filters)。
- 动作钩子:在特定事件发生时执行你的代码(如文章发布后)。
- 过滤器钩子:在特定数据被使用前修改它(如显示前改内容)。
- 钩子把你的代码和 WP 核心/其他插件连起来。
动作示例:文章发布后发邮件。
// 文章发布时,触发发邮件
add_action( 'publish_post', 'send_email_notification' );

function send_email_notification( $post_id ) {
  $to      = 'recipient@example.com';
  $subject = '新文章已发布';
  $message = '请查看网站上的新文章。';
  wp_mail( $to, $subject, $message );
}
过滤器示例:在文章内容前加一段文字。
// 显示内容前,插入自定义文本
add_filter( 'the_content', 'add_custom_text_to_content' );

function add_custom_text_to_content( $content ) {
  $custom_text     = '<p>这是自定义添加的文本。</p>';
  $modified_content = $custom_text . $content;
  return $modified_content;
}
标叔的经验:插件技术本质上就是 Filter + Action(即 Hook)。 想扩展功能就挂 Hook;不想动扩展,也能直接在页面写代码。 一句话记:Action = 事件驱动,Filter = 切面编程(中间件)。
可视化 WooCommerce Hook:https://www.businessbloomer.com/category/woocommerce-tips/visual-hook-series/ 50 个 WP 动作:https://www.wpdaxue.com/series/50-actions-of-wordpress 50 个 WP 过滤器:https://www.wpdaxue.com/series/50-filters-of-wordpress
§18 引入自定义脚本与样式
先给结论:CSS/JS 要用 wp_enqueue_* 挂,别硬写。
硬写在 <head> 里,会跟插件打架。
在 functions.php 里排队加载:
function mytheme_css() {
  // 加载样式
  wp_enqueue_style('main-css', get_template_directory_uri() . '/css/main.css');
  // 加载脚本,放 footer(最后一个参数为 true)
  wp_enqueue_script('main-js', get_template_directory_uri() . '/js/abc.js', array(), '', true);
}
add_action('wp_enqueue_scripts', 'mytheme_css');
CSS/JS 最终挂在 wp_head() 和 wp_footer():
<head>
  <?php wp_head(); ?>
</head>
<body>
  <?php wp_footer(); ?>
</body>
注意:永远用
wp_enqueue_*而不是直接<script src>。 前者能避免重复加载和依赖错乱。
§19 WordPress 数据结构
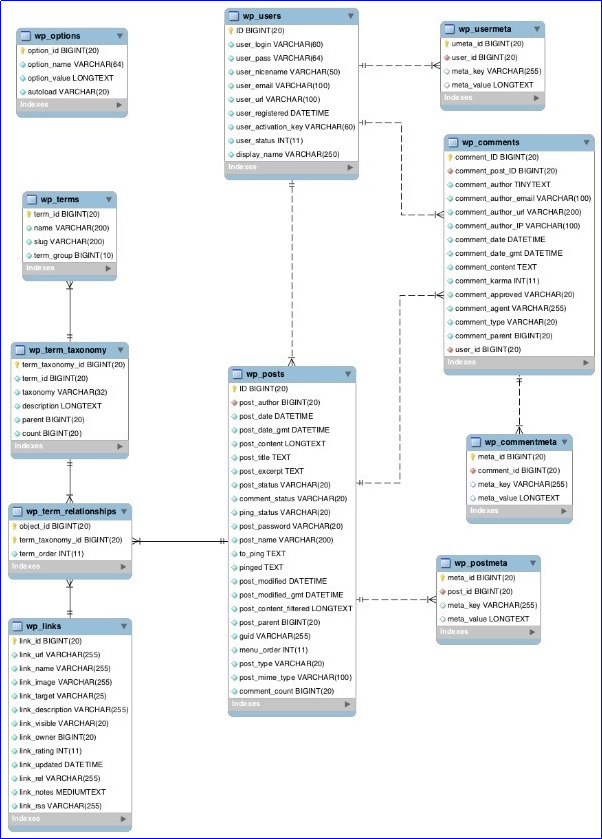
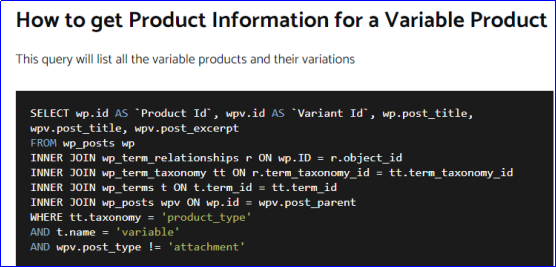
先给结论:理解了表结构,你就能直接写 SQL 排查问题。 WP/WC 的数据,全在几张核心表里。
理解数据结构: - https://www.wpdaxue.com/series/data-in-wordpress - https://www.wpdaxue.com/understanding-and-working-with-the-wordpress-options-table.html - WC 数据库描述:https://github.com/woocommerce/woocommerce/wiki/Database-Description - 从 SQL 角度看结构:https://www.hardworkingnerd.com/woocommerce-finding-products-in-the-database/ - 导入导出:https://kinsta.com/blog/woocommerce-export-products/ - wpdb 类:https://developer.wordpress.org/reference/classes/wpdb/
§20 函数与条件标签
先给结论:WP 函数有"显示型"和"返回型"两兄弟。
分清 the_* 和 get_the_*,循环里才不会出错。
A. the_*() 与 get_the_*()
the_title():直接输出标题(显示型)。get_the_title():返回标题字符串(返回型),常配合循环用。
$title = wp_title();        // 通用:取页面标题并输出
$title = get_the_title();  // 返回型:取当前文章标题
B. 条件标签
根据不同页面执行不同逻辑。
// 单品页前插入文字
add_action( 'woocommerce_before_single_product', 'bbloomer_echo_text' );
function bbloomer_echo_text() {
   global $product;
   if ( 25 === $product->get_id() ) {
      echo 'SOME TEXT';
   }
}
// 按页面类型分支
add_action( 'woocommerce_before_main_content', 'bbloomer_single_product_pages' );
function bbloomer_single_product_pages() {
    if ( is_product() ) {
        echo 'Something';
    } else {
        echo 'Something else';
    }
}
WooCommerce 条件逻辑指南:https://www.businessbloomer.com/woocommerce-conditional-logic-ultimate-php-guide/
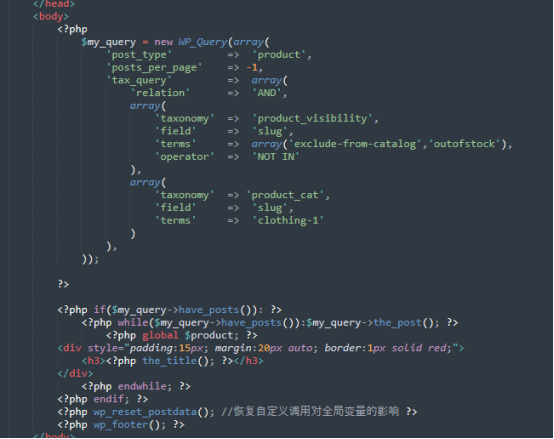
C. 了解 WP_Query
§21 自定义页面模板
先给结论:模板复用靠 get_template_part,内容插值靠短代码。
这两个是主题开发的日常。
A. get_template_part()
在 index.php 里加载 content.php:
if ( have_posts() ) :
  while ( have_posts() ) : the_post();
    get_template_part( 'content' ); // 加载 content.php
  endwhile;
endif;
带后缀的写法,加载 content-single.php:
get_template_part( 'content', 'single' );

B. 短代码(Shortcode)
把正文里的 [wpkt] 替换成指定 HTML:
// 注册 [wpkt] 短代码,在 functions.php 中添加
function wpkt_shortcode_handler( $atts = array(), $content = null, $tag = '' ) {
  $content = '<h2>WordPress课堂, www.wordpressKT.com</h2>';
  return $content;
}
function wpkt_shortcode_register() {
  add_shortcode( 'wpkt', 'wpkt_shortcode_handler' );
}
add_action( 'init', 'wpkt_shortcode_register' );
在模板里用:
echo do_shortcode('[wpkt]'); // 执行替换
自选商品组短代码(StackOverflow 案例):
function custom_product_list_shortcode( $atts, $content = null ) {
    $_atts = shortcode_atts( [ 'ids' => '' ], $atts );
    $ids_arr = array_filter( array_map( function( $id ) {
        return trim( $id );
    }, explode( ',', $_atts['ids'] ) ) );
    $products = wc_get_products( [
        'post_status'  => 'publish',
        'order_by'     => [ 'title' => 'ASC', 'post_date' => 'DESC' ],
        'posts_per_page' => -1,
        'post__in'     => $ids_arr,
    ] );
    ob_start();
    ?>
    <div class="products-list">
        <?php foreach ( $products as $product ) { ?>
            <div class="product">
                <pre><?= print_r( $product, true ); ?><?= get_title( $product->ID ); ?></pre>
            </div>
        <?php } ?>
    </div>
    <?php
    return ob_get_clean();
}
add_shortcode( 'custom_product_list', 'custom_product_list_shortcode' );
模板上调用:
[custom_products_list ids='32,21,44,56']
WooCommerce 自带短代码:
[products limit="12" columns="4" orderby="popularity"]
[woocommerce_checkout]
[woocommerce_my_account]
完整指南:https://quadlayers.com/woocommerce-shortcodes-the-ultimate-guide/
D. 自定义邮件模板
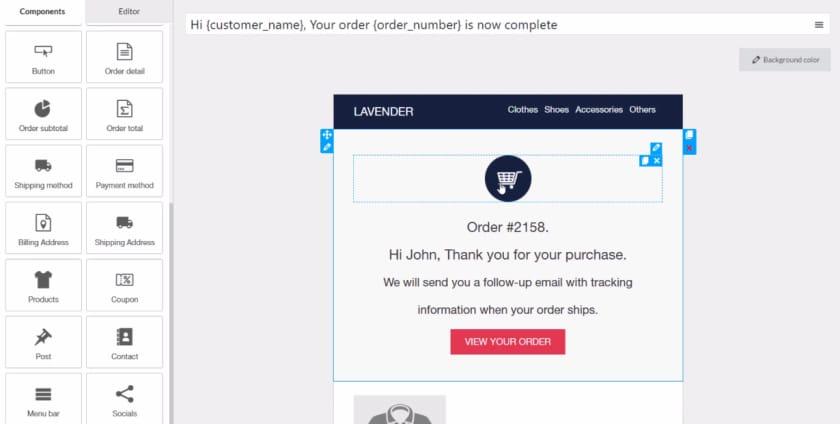
邮件模板参考:https://kinsta.com/topic/wordpress-plugins/#lms
§22 自定义文章类型与分类法
先给结论:WP 不止文章和页面。 你自己的业务对象,都能做成"自定义文章类型"。
自带文章类型:post、page、attachment、menu、revision。
注册自定义文章类型(在 functions.php):
function wpkt_custom_post_type() {
  $labels = array(
    'name'          => '图片',
    'singular_name' => '图片',
    'add_new'       => '发布图片',
    'all_items'     => '图片列表',
  );
  $args = [
    'labels'     => $labels,
    'public'     => true,
    'has_archive' => true,
    'rewrite'    => [ 'slug' => 'pics' ],
  ];
  register_post_type( 'pics', $args );
}
add_action( 'init', 'wpkt_custom_post_type' );
自带分类方式:category、post_tag、post_format、nav_menu。
注册自定义分类法(关联上面的 pics):
function wpkt_create_tax() {
  $labels = array(
    'name'          => '图片分类',
    'singular_name' => '图片分类',
    'search_items'  => '搜索图片分类',
    'all_items'     => '所有图片分类',
    'add_new_item'  => '添加图片分类',
  );
  $args = array(
    'labels'            => $labels,
    'public'            => true,
    'hierarchical'      => false,
    'show_ui'           => true,
    'show_in_nav_menus' => true,
    'rewrite'           => true,
    'query_var'         => true,
  );
  // pic_cat 是分类法名,绑定到 pics 这个 post type
  register_taxonomy( 'pic_cat', 'pics', $args );
}
add_action( 'init', 'wpkt_create_tax' );
自定义字段(产品为例)
添加字段:
add_action( 'woocommerce_product_options_stock_fields', 'my_restock_notice_field' );
function my_restock_notice_field() {
    global $woocommerce, $post;
    woocommerce_wp_textarea_input( array(
        'id'          => 'my_restock_notice',
        'placeholder' => 'Back in stock next week!',
        'label'       => 'Restock notice',
        'description' => 'Let your customers know when the product will be back in stock.',
        'desc_tip'    => 'true',
    ) );
}
保存字段:
add_action( 'woocommerce_process_product_meta', 'my_restock_notice_save_data' );
function my_restock_notice_save_data( $post_id ) {
    if ( 'no' === get_option( 'woocommerce_manage_stock' ) ) {
        return;
    }
    $my_restock_notice_textarea = $_POST['my_restock_notice'];
    if ( ! empty( $my_restock_notice_textarea ) ) {
        update_post_meta( $post_id, 'my_restock_notice', esc_html( $my_restock_notice_textarea ) );
    }
}
显示字段:
$notice = get_post_meta( $product->get_ID(), 'my_restock_notice', true );
参考: - https://www.wpdaxue.com/add-and-display-custom-fields-on-woocommerce.html - https://www.cloudways.com/blog/add-custom-product-fields-woocommerce/ - 用插件加字段:https://wordpress.org/plugins/woo-extra-product-options/ - 自定义排序:https://www.cloudways.com/blog/woocommerce-product-sort-and-display/
§23 选项 API 与瞬态 API
先给结论:配置项存 Options 表,缓存用 Transients。 这两个 API 是"存设置、存临时数据"的标准姿势。
选项 API(Options API)
一组管理网站配置的函数:
add_option():新增选项update_option():更新选项get_option():读取选项delete_option():删除选项
主题色、站点标题、社媒链接等,都走这里。 还能做自定义设置页面,让用户自己改。
工具推荐(阿树框架):https://github.com/ashuwp/Ashuwp_framework
瞬态 API(Transients API)
用于带过期时间的缓存。 适合放"算起来贵、一段时间不变"的数据,比如首页排行榜。
标叔的经验:能缓存的查询就别每次都查库。 我一个站点加了 Transients 缓存后,首页加载从 1.8s 降到 0.6s。
§24 小部件区域与菜单区域
先给结论:侧边栏和导航,都是"注册区域 + 拖组件"。 不懂区域(widget area),就没法让运营自己改版。
小部件区域(Widget Area)
后台 外观 → 小部件 里能拖的那些块,背后是注册好的区域。
主题用 register_sidebar() 注册,模板用 dynamic_sidebar() 输出。
菜单区域(Menu Area)
后台 外观 → 菜单 里"显示位置"的那些勾选项,也是注册出来的。
Mega Menu(超级菜单)
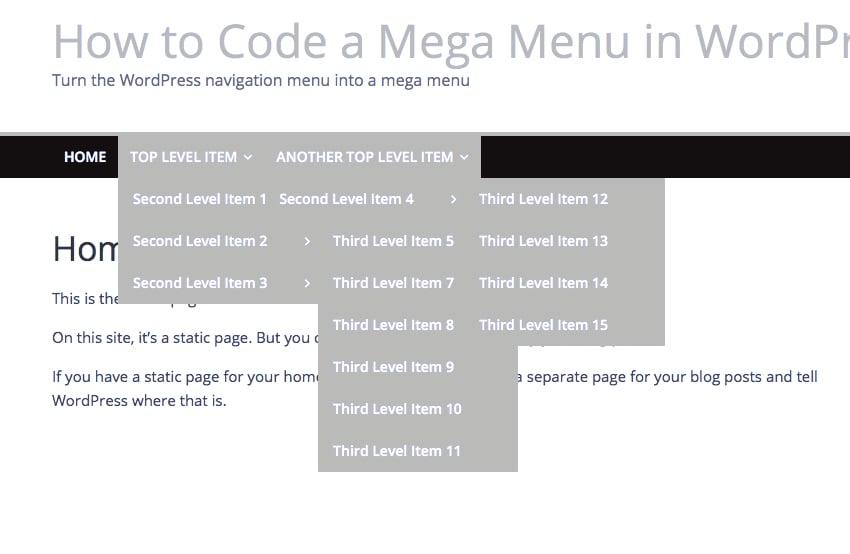
教程:https://code.tutsplus.com/tutorials/how-to-code-a-mega-menu-in-wordpress--cms-33203
§25 开发调试工具
先给结论:别用 echo 猜 bug。上专业工具。
两个插件 + 一个开关,省下你一半调试时间。
1. Query Monitor 免费开发者工具,看数据库查询、PHP 错误、HTTP 调用、内存、环境信息。 教程:https://facetwp.com/how-to-use-query-monitor-to-optimize-performance/
2. Debug Bar 在前端/后台显示调试工具栏。 插件:https://wordpress.org/plugins/debug-bar/
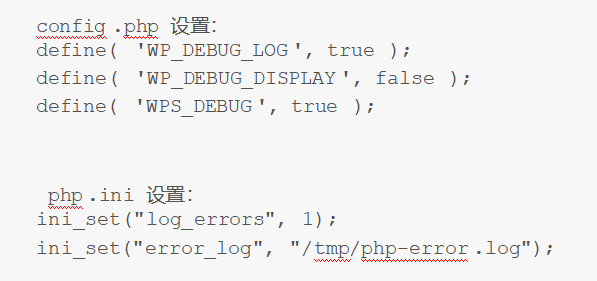
3. 打开 WP_DEBUG
在 wp-config.php 里加:
define( 'WP_DEBUG', true );
这会让所有 PHP 错误、通知、警告都显示出来。
更多:https://kinsta.com/blog/wordpress-debug/
向前桥接:WordPress 地基打完了。 进 Part 3,正式碰 WooCommerce——安装、配置、产品和那几个核心对象。